In this post, I’ll talk about the XNA Content Pipeline. When I first tried to load a resource in the XNA game, I was trying to do as usual : opening a file and reading it using standard file reading functions. However, on XNA you have to use the Content Pipeline provided and to be honest, they have made a very good work with that. This pipeline can load some known file formats (jpg textures or wav sounds for instance) but you can extend the pipeline for your own custom formats.
I used many different types of file format for Spring Up!, for instance:
- TGA for 32b images (I used TGA because it’s a very simple file format)
- SWF for menus, level description and physics definition (ShockWave Flash, using the gameswf library)
- WAV for sounds
- OGG for music
- Custom text files for translated texts and particle definition (called RSC and PRT)
- Custom binary files for various data (DAT files).
The XNA Content Pipeline is really integrated into your XNA game project. You just add the resource to your project and when you compile it, the data is imported and converted in a XNB (XNA Binary File) using a Content Importer. This XNB file is generated for the right platform. It means you do not have to bother about little/big endian of the platform (Windows or X360). Once the resource is in your project, you create game objects with only one line of code. For instance, you can add a texture file to your project, and then load it using the following code:
Texture2D my_texture = Content.Load<Texture2D>("texture");
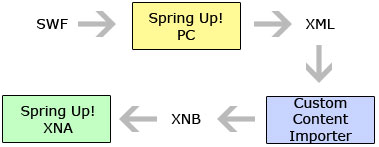
There are many file formats handled by XNA but when using specific data, you have to develop your own custom Content Importer. As told in a previous article, I will not port gameswf for many reasons so all the data I have in SWF files has to be included in another way into the X360 game. I started to include one of the most important data : the definitions of the levels. To do this on X360, I developed a quick XML exporter in the PC version of Spring Up! Then, I read the XML with my custom Content Importer. The XNA Game Studio then generates the XNB. The following diagram shows the flow of the data:

- Levels data flow in Spring Up!
Now that my importer is in place, I can read a level definition using the following code:
LevelDef level = Content.Load<LevelDef>("level01");
And that’s it!
I have three importers already in place in the current version:
- Sprite : binary format containing position and size of a sprite in a texture page. It was my first importer using XNA. It could (should?) have been XML. Original PC data was in the SWF, it is exported in binary from the PC game.
- Level : position and type of items of the levels of the game. Original PC data was in the SWF, it is exported in xml from the PC game.
- Physics : the definition of the physics properties of the items (size, shape, mass). This one is not completed yet, I still have pivots and joints to include. Original PC data was in the SWF (in actionscript code), it is exported in XML from the PC game, too.
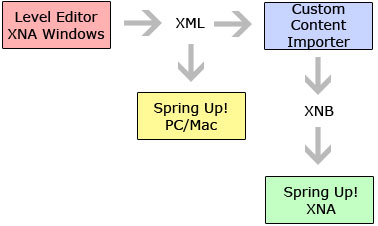
If I knew from the beginning that the game would be developed on XNA, I would have done differently. The fact that I’m porting an existing product made me choose this solution of creating the exporters on PC and reimporting the data in XNA Game Studio. Ideally; I would have createed a level editor (with a Windows XNA project probably) saving data in XML. Then I’d use the content importer to put the resource in the XNA game and read directly the XML for a PC/Mac game (see diagram below).

- Possibility for a multi-platform PC/Mac/X360 project
As I plan to improve greatly the game, it is still possible that I will develop a specific level editor to be able to create new types of objects and physics items.
That’s it for my basic introduction to the XNA Content Pipeline. If you have any questions about the use of the pipeline, about importers or anything else, feel free to ask in the comments section below!
1 comment
Comments are closed.